How to write a plugin for nopCommerce
Plugins are used to extend the functionality of nopCommerce. nopCommerce has several types of plugins. For example, payment methods (such as PayPal), tax providers, shipping method computation methods (such as UPS, USP, FedEx), widgets (such as 'live chat' block), and many others. nopCommerce is already distributed with many different plugins. You can also search various plugins on the nopCommerce official site to see if someone has already created a plugin that suits your needs. If not, this article will guide you through the process of creating your own plugin.
The plugin structure, required files, and locations
First thing you need to do is to create a new "Class Library" project in the solution. It's a good practice to place all plugins into
\Pluginsdirectory in the root of your solution (do not mix up with \Plugins subdirectory located in\Nop.Webdirectory which is used for already deployed plugins). It's a good practice to place all plugins into "Plugins" solution folder.A recommended name for a plugin project is "Nop.Plugin.{Group}.{Name}". {Group} is your plugin group (for example, "Payment" or "Shipping"). {Name} is your plugin name (for example, "PayPalStandard"). For example, PayPal Standard payment plugin has the following name: Nop.Plugin.Payments.PayPalStandard. But please note that it's not a requirement. And you can choose any name for a plugin. For example, "MyGreatPlugin".
Once the plugin project is created you have to open its
.csprojfile in any text editor and replace its content with the following one:<Project Sdk="Microsoft.NET.Sdk"> <PropertyGroup> <TargetFramework>netcoreapp3.1</TargetFramework> <Copyright>SOME_COPYRIGHT</Copyright> <Company>YOUR_COMPANY</Company> <Authors>SOME_AUTHORS</Authors> <PackageLicenseUrl>PACKAGE_LICENSE_URL</PackageLicenseUrl> <PackageProjectUrl>PACKAGE_PROJECT_URL</PackageProjectUrl> <RepositoryUrl>REPOSITORY_URL</RepositoryUrl> <RepositoryType>Git</RepositoryType> <OutputPath>..\..\Presentation\Nop.Web\Plugins\PLUGIN_OUTPUT_DIRECTORY</OutputPath> <OutDir>$(OutputPath)</OutDir> <!--Set this parameter to true to get the dlls copied from the NuGet cache to the output of your project. You need to set this parameter to true if your plugin has a nuget package to ensure that the dlls copied from the NuGet cache to the output of your project--> <CopyLocalLockFileAssemblies>true</CopyLocalLockFileAssemblies> </PropertyGroup> <ItemGroup> <ProjectReference Include="..\..\Presentation\Nop.Web.Framework\Nop.Web.Framework.csproj" /> <ClearPluginAssemblies Include="$(MSBuildProjectDirectory)\..\..\Build\ClearPluginAssemblies.proj" /> </ItemGroup> <!-- This target execute after "Build" target --> <Target Name="NopTarget" AfterTargets="Build"> <!-- Delete unnecessary libraries from plugins path --> <MSBuild Projects="@(ClearPluginAssemblies)" Properties="PluginPath=$(MSBuildProjectDirectory)\ $(OutDir)" Targets="NopClear" /> </Target> </Project>Tip
Where PLUGIN_OUTPUT_DIRECTORY should be replaced with the plugin name, for example, Payments.PayPalStandard.
We do it this way to be able to use a new approach to add third-party references which was introduced in .NET Core. But actually it's not required. Moreover, references from already referenced libraries will be loaded automatically. So it is very convenient.
The next step is creating a
plugin.jsonfile required for each plugin. This file contains meta information describing your plugin. Just copy this file from any other existing plugin and modify it for your needs. For example, PayPal Standard payment plugin has the followingplugin.jsonfile:{ "Group": "Payment methods", "FriendlyName": "PayPal Standard", "SystemName": "Payments.PayPalStandard", "Version": "1.60", "SupportedVersions": [ "4.30" ], "Author": "nopCommerce team", "DisplayOrder": 1, "FileName": "Nop.Plugin.Payments.PayPalStandard.dll", "Description": "This plugin allows paying with PayPal Standard" }Note
Also,
plugin.jsonfile may contain the following fields:- LimitedToStores - The list of store identifiers in which this plugin is available. If empty, then this plugin is available in all stores.
- LimitedToCustomerRoles - The list of customer role identifiers for which this plugin is available. If empty, then this plugin is available for all ones.
- DependsOnSystemNames - The list of plugins' system name that this plugin depends on
Actually all fields are self-descriptive, but here are some notes. SystemName field should be unique. Version field is a version number of your plugin; you can set it to any value you like. SupportedVersions field can contain a list of supported nopCommerce versions separated by commas (ensure that the current version of nopCommerce is included in this list, otherwise, it will not be loaded). FileName field has the following format Nop.Plugin.{Group}.{Name}.dll (it is your plugin assembly filename). Ensure that "Copy to Output Directory" property of this file is set to "Copy if newer".

The last required step is to create a class which implements IPlugin interface (Nop.Services.Plugins namespace). nopCommerce has BasePlugin class which already implements some IPlugin methods and allows you to avoid source code duplication. nopCommerce also provides you with some specific interfaces derived from IPlugin. For example, we have "IPaymentMethod" interface which is used for creating new payment method plugins. It contains some methods which are specific only for payment methods such as ProcessPayment() or GetAdditionalHandlingFee(). Currently nopCommerce has the following specific plugin interfaces:
- IExternalAuthenticationMethod. Used for creating external authentication methods such as Facebook, Twitter, OpenID, etc.
- IWidgetPlugin. It allows you to create widgets. Widgets are rendered on some parts of your site. For example, it can be a "Live chat" block on the left column of your site.
- IExchangeRateProvider. Used for getting currency exchange rate.
- IDiscountRequirementRule. Allows you to create new discount rules such as "Billing country of a customer should be…"
- IPaymentMethod. Plugins which are used for payment processing.
- IShippingRateComputationMethod. These plugins are used for retrieving accepted delivery methods and appropriate shipping rates. For example, UPS, UPS, FedEx, etc.
- ITaxProvider. Tax providers are used for getting tax rates.
- IMiscPlugin. If your plugin doesn't fit any of these interfaces
Important
Important note: After each project build, clean the solution before making changes. Some resources will be cached and can lead to developer insanity.
Important
You may need to rebuild your solution after adding your plugin. If you do not see DLLs for your plugin under Nop.Web\Plugins\PLUGIN_OUTPUT_DIRECTORY, you need to rebuild your solution. nopCommerce will not list your plugin in the Local Plugins page if your DLLs do not exist in the correct folder in Nop.Web.
Handling requests. Controllers, models and views
Now you can see the plugin by going to Admin area → Configuration → Local Plugins. But as you guessed our plugin does nothing. It does not even have a user interface for its configuration. Let's create a page to configure the plugin.
What we need to do now is create a controller, a model, and a view.
- MVC controllers are responsible for responding to requests made against an ASP.NET MVC website. Each browser request is mapped to a particular controller.
- A view contains the HTML markup and content that is sent to the browser. A view is the equivalent of a page when working with an ASP.NET MVC application.
- An MVC model contains all of your application logic that is not contained in a view or a controller.
You can find more information about the MVC pattern here.
So let's start:
Create the model. Add a Models folder in the new plugin, and then add a new model class which fits your need.
Create the view. Add a Views folder in the new plugin, and then add a cshtml file named
Configure.cshtml. Set "Build Action" property of the view file is set to "Content", and the "Copy to Output Directory" property is set to "Copy always". Note that configuration page should use "_ConfigurePlugin" layout.Also make sure that you have
_ViewImports.cshtmlfile into your \Views directory. You can just copy it from any other existing plugin.Create the controller. Add a Controllers folder in the new plugin, and then add a new controller class. A good practice is to name plugin controllers
{Group}{Name}Controller.cs. For example, PaymentPayPalStandardController. Of course it's not a requirement to name controllers this way (but just a recommendation). Then create an appropriate action method for configuration page (in admin area). Let's name it "Configure". Prepare a model class and pass it to the following view using a physical view path:~/Plugins/{PluginOutputDirectory}/Views/Configure.cshtml.Use the following attributes for your action method:
[AuthorizeAdmin] //confirms access to the admin panel
[Area(AreaNames.Admin)] //specifies the area containing a controller or action
For example, open PayPalStandard payment plugin and look at its implementation of PaymentPayPalStandardController.
Then for each plugin which has a configuration page you should specify a configuration url. Base class named BasePlugin has GetConfigurationPageUrl method which returns a configuration url:
public override string GetConfigurationPageUrl()
{
    return $"{_webHelper.GetStoreLocation()}Admin/{CONTROLLER_NAME}/{ACTION_NAME}";
}
Where {CONTROLLER_NAME} is a name of your controller and {ACTION_NAME} is a name of action (usually it's "Configure").
Once you have installed your plugin and added the configuration method you will find a link to configure your plugin under Admin → Configuration → Local Plugins.
Tip
Tip: The easiest way to complete the steps described above is opening any other plugin and copying these files into your plugin project. Then just rename appropriate classes and directories.
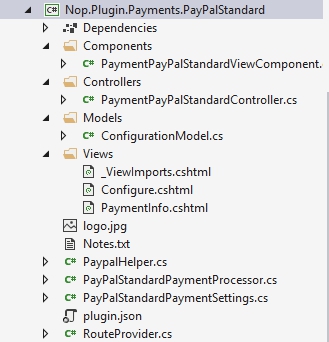
For example, the project structure of PayPalStandard plugin looks like the image below:
Handling "Install", "Uninstall" and "Update" methods
This step is optional. Some plugins can require additional logic during plugin installation. For example, a plugin can insert new locale resources. So open your IPlugin implementation (in most case it'll be derived from BasePlugin class) and override the following methods:
- Install. This method will be invoked during plugin installation. You can initialize any settings here, insert new locale resources, or create some new database tables (if required).
- Uninstall. This method will be invoked during plugin uninstallation.
- Update. This method will be invoked during plugin the update (when its version is changed in the
plugin.jsonfile).
Important
Important note: If you override one of these methods, do not hide its base implementation.
For example, overridden "Install" method should include the following method call: base.Install(). The "Install" method of PayPalStandard plugin looks like the code below
public override void Install()
{
    var settings = new PayPalStandardPaymentSettings()
    {
        UseSandbox = true
    };
    _settingService.SaveSetting(settings);
    ...
    base.Install();
}
Tip
The list of installed plugins is located in \App_Data\plugins.json. The list is created during installation.
Routes
Here we will have a look at how to register plugin routes. ASP.NET Core routing is responsible for mapping incoming browser requests to particular MVC controller actions. You can find more information about routing here. So follow the next steps:
If you need to add some custom route, then create RouteProvider.cs file. It informs the nopCommerce system about plugin routes. For example, the following RouteProvider class adds a new route which can be accessed by opening your web browser and navigating to http://www.yourStore.com/Plugins/PaymentPayPalStandard/PDTHandler URL (used by PayPal plugin):
public partial class RouteProvider : IRouteProvider
{
    public void RegisterRoutes(IEndpointRouteBuilder endpointRouteBuilder)
    {
        //PDT
        endpointRouteBuilder.MapControllerRoute("Plugin.Payments.PayPalStandard.PDTHandler", "Plugins/PaymentPayPalStandard/PDTHandler",
                new { controller = "PaymentPayPalStandard", action = "PDTHandler" });
    }
    public int Priority => -1;
}
Upgrading nopCommerce may break plugins
Some plugins may become outdated and no longer work with the newer version of nopCommerce. If you have issues after upgrading to the newer version, delete the plugin and visit the official nopCommerce website to see if a newer version is available. Many plugin authors will upgrade their plugins to accommodate the newer version, however, some will not and their plugin will become obsolete with the improvements in nopCommerce. But in most cases, you can simply open an appropriate plugin.json file and update SupportedVersions field.
Conclusion
Hopefully this will get you started with nopCommerce and prepare you to build more elaborate plugins.
Plugin template
You can use our Visual Studio template for new nopCommerce plugins. It can save a lot of time for developers, because now they don't have to do manually all initial steps. Such as folders creation (Controllers, Views, Models etc.), other required files (DependencyRegistrar.cs, _ViewImports.cshtml, ObjectContex, plugin.json etc), configuration, project references, etc). Please find it and installation instructions here