Installing on Windows
This chapter describes how to download nopCommerce software, upload it to your server and install it. You may also watch the screencast about nopCommerce installation on our YouTube channel.
Before you begin the install, ensure that your web host have the minimum requirements to run nopCommerce.
Note
For more information on hosting selection guidelines, visit this page.
Download nopCommerce
To install nopCommerce on Windows you should download it first. Go to download page and choose the Package without source code version for Windows. This is a pre-compiled version of nopCommerce that can simply be uploaded to your hosting provider and used immediately.
Upload the nopCommerce files
The next step is to upload the nopCommerce files to your server. To do this you need to use an FTP connection which allows transferring files between computers. Follow the next steps to set this up:
- Choose and download one of FTP client applications which you will use for transferring files.
- Find your FTP credentials in your hosting control panel.
- In your FTP client application, set up the connection between your computer and the server using the FTP credentials you found in the previous step.
- Upload the nopCommerce files to the server.
Create a database
Before running nopCommerce create a new database instance in your hosting control panel. This database will be used to store your website data.
Note
When creating the database choose MS SQL Server version 2012 or above if requested.
We will use the name, server name (or IP, URL), user login and password of your database during the installation process later. These credentials are required for the database connection.
Create a new website
Create a new website in your hosting control panel. Then find a url which allows you to acces this site.
Install nopCommerce
Using the url from the previous step access the website from your browser.
Once you open the site for the first time, you will be redirected to the installation page, as follows:
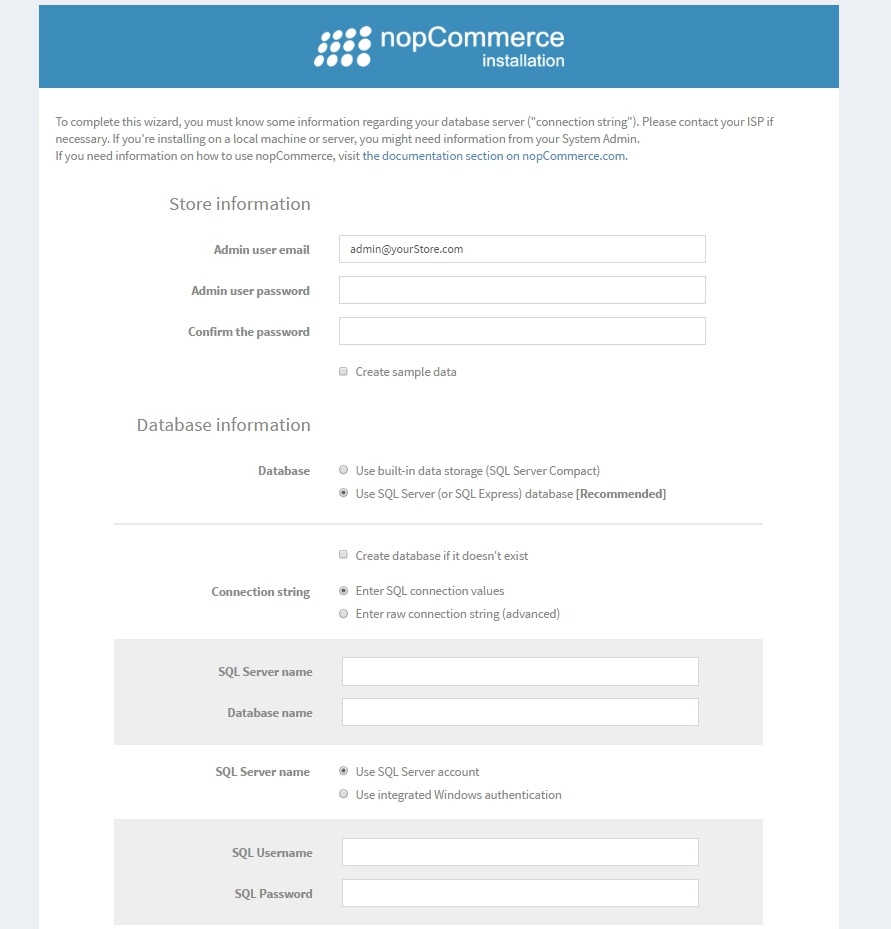
In the Store information panel fill the following details:
- Admin user email: this is the email address for the first admin of the site.
- Admin user password: you will need to supply a password for the admin account.
- Confirm the password: confirm the admin user password.
- Create sample data: check this checkbox if you would like sample products to be created. This is recommended so you can start working with your site before adding any of your own products. You can always delete these items later, or unpublish them so they no longer appear on your site.
In the Database information panel you need to enter the following info:
- Database: here you can select either Microsoft SQL Server or MySQL. Choose the first one if you installing nopCommerce on Windows.
- Create database if it doesn't exist: it is recommended that you create your database and database user beforehand to ensure a successful installation. Simply create a database instance and add the database user to it. The installation process will create all the tables, stored procedures, and so on.
- Enter raw connection string (advanced): check this checkbox if you want to enter a Connection string instead of filling the connection fields.
- Server name: this is the IP, URL, or server name of your database. Get your server name from the hosting control panel.
- Database name: this is the name of the database used by nopCommerce. If you opted to create your database ahead of time, use the name you gave your database here.
- Use integrated Windows authentication: if you are installing at a hosting provider, you don't need to use this option.
- SQL Username: enter your database user login.
- SQL Password: ener your database user password.
- Specify custom collation: this is an advanced setting and should be left unchecked.
Click Install in order to start the installation process. When the setup process is complete, your new site's home page is displayed.
Note
The Restart installation button at the bottom of the installation page enables you to restart the installation process in case anything goes wrong.
Note
If you want to completely reset a nopCommerce site to its default settings, you can delete the dataSettings.json file from the App_Data directory.